Desert Online General Trading LLC
Dubai, United Arab Emirates
Desert Online General Trading LLC
Dubai, United Arab Emirates


🚀 Elevate Your Raspberry Pi Experience!
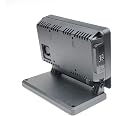
The SmartiPi Touch Pro is a robust and stylish case designed for Raspberry Pi 3, 4, and 5, featuring a cooling fan, weighted base, and compatibility with HAT boards, making it the perfect companion for your next tech project.


| Number of USB 3.0 Ports | 1 |
| Brand | Smarticase |
| Series | Smarticase |
| Item model number | STPSB |
| Item Weight | 1.56 pounds |
| Package Dimensions | 8.5 x 5.94 x 1.93 inches |
| Color | Black |
| Manufacturer | Smarticase |
| ASIN | B08VSDCQM2 |
| Date First Available | February 4, 2021 |
J**A
This is my second Touch case
I thought I love my other smarty pie case, well I love this one more cause it has more room to fit more stuff in there. I was able to fit a battery in there 10,000 million power battery I mean it it’s got enough space to do anything in there in the value, the sleet look And that fourth thought that went into making the case all priceless.
M**N
Well made, easy to assemble, excellent instructions (online)
Assembly took some time but everything went smoothly. Everything fit like it was supposed to. Most screws thread smoothly into brass inserts and the instructions (online) were very thorough and easy to follow. This sounds so much like a fake review that I will mention an enhancement that would help with prototyping. To operate without the back you must remove two screws to release the power cable from the back. It would be handy if the power inlet mounted on the same part of the case as the devices or at least had a tool-less release from the back.
M**E
Great Product
I've bought a few of these in the past few years for projects. These are quality cases for raspberry pi touch screen projects.
R**H
Works great with Raspberry Pi 5.
I have no complaints. As others have said, the instructions were sketchy, but if you've messed around enough, like I have, trying to come up with a decent solution for the RPI5 and the 7" touchscreen, that won't matter.The roominess is great, there was plenty of room for the Pi as well as the NVMe board.
A**N
Great execution; could use some fine-tuning. Here are some tips
This is my second case for my official Pi touchscreen. I needed a new case when I moved to the Pi4. I bought the largest size, so I could use a large passive heatsink and/or a Hat/shield.GOOD:Holds the monitor, is tiltable (and doesn't fall down), and the base is heavy enough to counterbalance the display. Ethernet and USB ports easily accessible. Also there is an extra "pocket of space" below the main case volume (where USB Power-In goes), and the continued this space for some unused space on the left... this gives you a place to hack in another cable if you need. The VESA mounting holes have brass inserts for longevity (nice!). The mount for the fan has a cover plate, which means you can close it up or use it for things other than a fan..Internal access to cables not exposed (camera, HDMI etc) is sufficient meaning you can remove the back panel WITHOUT complete disassembly. Noted above, there's room to plug in an external HDMI cable inside (but beware... there's no designated spot for passing it through the case walls... be creative)COULD BE BETTER:1) Manufacturer should sell their own "micro HDMI panel mount" adapters. You can get panel mount adapters online, but they're usually using full-size HDMI on one side. Someone makes a micro on both ends (so you would have to cut up your case less) but they're hard to find in stock.2) Adding a second "panel/fan mount" on the back right side, for symmetry and flexibility in case you want to route cables through the existing fan hole.TIPSYou can easily fit a passive heatsink in here. The "Geekworm" ones that cover the whole board WILL fit but you have to discard the bottom plate, and maybe grind metal in a spot or two for clearance. The GW heatsinks stay away from the USB/Ethernet area so grinding modifications would be minimal.I ran my micro-HDMI cable out the fan hole. BEWARE this risks damaging the Pi board because if the case falls, the cable will transfer shearing force against the Pi's socket. I'm OK with this risk, but this highlights the importance of a real "panel mount HDMI" accessory.
J**Y
Great case.
Very well thought out and solid feeling. Great options for mounting. It even comes with two splitter cables to power the Pi and touchscreen. The only thing I wish it had was holes for one or two speakers, but I can handle that with a dremel. Otherwise this is the best case I've seen so far.
C**Y
A good case with a lot of potential for the Official Raspberry Pi touchscreen.
The touchscreen itself leaves a lot to be desired, but the is the best case for it.A micro SD to SD card extender makes it even better, as it is not easy to change micro SD cards without it. The ribbon cable for it fits through the fan hole in the case.I like the VESA and keyhole mounts on the back for use without the base, and the included hinges for use without the base (similar in design to the hinge on the base, but the hinges attach via screw to whatever surface you wish to mount it to.)I was able to run some wires to the GPIO pins through a vent in the back of the case.There's adequate room in the case for a hat on the pi and room where another small device could be placed if necessary...
S**R
Pi 5 Warning
The case is supposed to be compatible with Raspberry Pi model 5. However, according to the documentation, there are issues. To quote the set-up guide: "One thing to note is that even if you are using a 5A power supply, our splitter cable is only rated for 3A. If you try to draw more than 3A through our splitter, the voltage will drop too low for the Raspberry Pi to function and it will reboot." It also states that because of this splitter cable, the Pi will restrict current to the USB ports. Here is their workaround:"There are no communication lines in our splitter cable therefore the Raspberry Pi will not be able to detect a 5A power supply even if it is connected. Therefore it is not possible to prevent this message from appearing. You can overide the restricting of the current to the USB ports by doing one of the two things below.1 - Adding usb_max_current_enable=1 in /boot/firmware/config.txtOR2 - Enabling USB max current on the Pi OS desktop GUI under preferences -> configuration"So, why even attempt to perform the workaround when their splitter cable isn't capable of passing the current to begin with? Confusing. I suppose connecting the power supply directly to the Pi, bypassing the splitter, will solve the problem while creating another; that would make the installation kludgey and messy. A clean setup is why we buy this case! Not happy.
Trustpilot
5 days ago
2 weeks ago